Band Saw Laceration – Final Assessment

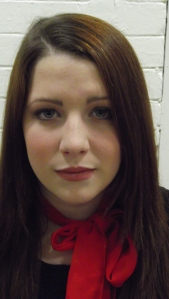
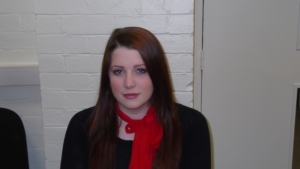
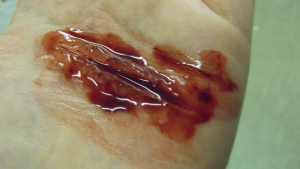
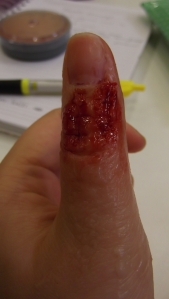
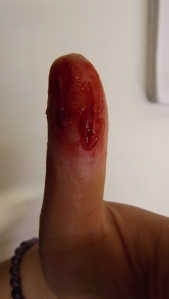
For our final assessment for semester one we had to create an injury that would have been occurred within a workshop in college. For my assessment I decide to try and recreate a wound created by a band saw. Overall I am happy with my final effect although I did go over the top with the blood splatter with i now know for next time. This kind of effect could be used in film or television. Below are a few pictures of my final assessment.

This slideshow requires JavaScript.

Products Used

  • Pierce Soft Morticians Wax
  • Liquid Latex
  • Glynn Mc Kays Kits Dark Wound Filler
  • Glynn Mc Kays Kits Red Light & Dark Bruise Gels
  • Glynn Mc Kays Kits Congealed Blood
  • Kryolan Translucent Powder

Thanks for Reading

Hannah xoxo

70s Disco Frogs

For my second work experience myself and others in the class were asked to create make-up for 70s style frogs that were going to be in one of our colleges stage productions. My friend Katy (link to her blog here) designed a stencil which could be used on the arms of the frogs. To create the frog look we used green snazaroo face paints of the main colour and then a mixture of black and green for the marks on the arms. Overall I feel that the frogs make-up went well, however we did get rushed towards the end but we did manage to get all of the frogs done. See below for a picture of one of the finished frogs.

Picture 347

Thanks for reading

Hannah xoxo

Colour Theory Fashion

For our final assessment of semester one we we’re given the task of creating a fashion make-up using colour theory. By using colour theory we were able to be as creative as we wanted when it came to creating a make-up look. After doing some research,see my pinterest  for a mini mood board (link here), I decided to go with complementary colour theory by using the colours purple and yellow. As part of our assessment we we’re given a chance to have professional photographs taken of our make-up as well as having the opportunity to get out of the college studio and out on location. Before I made a decision on my final make-up I experimented with different looks with the colours I wanted to use. Once I had finished experimenting I decided to go with a purple eye with a hint of yellow, a dark purple lip and gold eyebrows. Overall I am pleased with  my final look and after spending the day doing hair and make-up I feel that I would maybe like to have a career in fashion make-up or in editorial make-up. Below I will post the professional photos as soon as i get the but for now I have a few of my own.

This slideshow requires JavaScript.

Products used

Face:

  • Illamasqua Satin Primer -Buffed into the Skin
  • MAC Cosmetics Face and body foundation C1 – Buffed into skin
  • W7 Concealer palette – To cover any blemishes or pigmentation
  • Illamasqua loose powder- Pressed onto skin using powder puff
  • MAC Cosmetics Bronzing Powder – Contour the cheeks
  • Avon Glows Bronzing pearls cool – highlight cheek bones

Eyes:

  • Urban Decay Eye shadow Primer Potion – Applied to eyelid up to brow
  • Illamasqua Cream pigment Mould – Apply as base colour for eye shadow
  • Beautify 168 Colour Mix eyeshadow palette – Aubergine colour applied all over lid and blended out in a wing shape and applied
  • Snazaroo Iridescent Powder gold applied gently over purple eye shadow
  • Gold leaf – appled to eyebrows with eyelash glue
  • Bouriois black kohl eyeliner – Applied to both top and bottom waterline
  • Collection 2000 Longer Lash Mascara -Applied to both top and bottom lashes
  • False Eyelashes applied to the top lashes

Lips:

  • Sleek Eau la la liner Raisin 293
  • Sleek True Colour Lipstick Mulberry 788
  • Snazaroo Iridescent Powder gold applied gently over purple lipstick

Thanks for Reading

Hannah xoxox

Theater Make-up

As part of our semester 1 learning we had learn and recreate large theater make-up . When  applying theater make-up it is important to keep in mind that the make-up is being used to define the face so that the actors expressions can be “read” easily by the audience as they are most likely to be siting at a distance from the stage, meaning that the make-up can look a bit over the top and comical up close. Also another key factor to keep in mind is that theater make-up is used to alter the persons character and to also reflect the part they are playing. Below are a few photos from my theater make-up final assessment. I will hold my hands up and fully admit that i’m not a huge fan of theater make-up and can honestly say that i struggled when it came to the make up. When I first attempted the make-up I was completely fine with doing the eyes and lips but struggled using creme products to contour and highlight and felt that my fist attempt wasn’t that good so i made the decision to re-do the make again (shown in the pictures below). Having re-done the theater make-up again I was much happier with the result although I think I could have done with going a little darker with the contouring.

This slideshow requires JavaScript.

Products Used

Face:

  • Illamasqua Matte Primer -Buffed into the Skin
  • Max Factor Pan Stick Cool Copper – Buffed into the skin
  • Kryolan Grease Paints Dark Brown – Applied as contour under cheek bone, jawline, temples, fore head and either side of the nose and buffed out slightly
  • Kryolan Grease Paint Light Flesh colour – Applied as highlight to tops of cheek bones, centre of fore head and bridge of the nose
  • Illamasqua loose powder- Pressed onto skin using powder puff

Eyes:

  • Urban Decay Eye shadow Primer Potion – Applied to eyelid up to brow
  • MAC Eye Shadows –
    • Orb- all over eye lid,
    • Era and Concrete blend together in the crease in a ‘c’ shape
    • Concrete through  the eyebrows to define
  • Collection 2000 Longer Lash Mascara -Applied to both top and bottom lashes
  • False Eyelashes applied to the top lashes

Lips:

  • MAC Lip liner Cherry – Follow the natural lip line
  • MAC Lipstick Rubywoo – Applied with lip brush

Thanks for reading

Hannah xoxo

TV Make-up Adaptation

After completing an assessment for basic TV make-up, we then had to adapt the make up making it more suitable for evening television e.g. Strictly Come Dancing, X Factor, celebrity juice etc. For the adaptation we had the opportunity to make it more glamorous and be a bit more creative. Below are some pictures of my lovely friend Bex. Overall i am pleased with my adaptation of TV make-up, but feel that i could have do better. If i could do it again i would have probably done the eyes a bit more smokey and added false lashes also i think i would have used a brighter colour on the lips.

This slideshow requires JavaScript.

Products Used

Face:

  • Illamasqua Matte Primer -Buffed into the Skin
  • MAC Studio Tech Foundation – Buffed into the skin
  • W7 Concealer – Applied to under eye and on any blemishes
  • Illamasqua loose powder – Pressed onto skin using powder puff
  • MAC Bronzing Powder Matte Bronze – Applied to hollows of the cheek, temples and jaw line
  • MAC Powder Blush Cubic – Applied to apples of the cheek

Eyes:

  • Urban Decay Eye shadow Primer Potion – Applied to eyelid up to brow
  • Urban Decay Naked Pallete Eye Shadows –
    • Sin – Apply all over lid and brow bone
    • Toasted –  Apply to half the lid and buff with MAC 224
    • Hustle – Apply to outer V and buff with MAC 224
  • MAC Eye Shadow Concrete -Apply to eyebrows with angled brush
  • MAC Fluidline Eye-liner Gel BlackTrack – Apply to thinly to upper lash line
  • Bourjois Paris Khole & Contour Eyeliner Eye pencil – Apply half way to lower lash line and smudge out and apply black eye shadow to set
  • Collection 2000 Longer Lash Mascara -Applied to both top and bottom lashes

Lips:

  • Mac Lip Liner Whirl – Apply to outline of lips
  • Loreal Paris Studio Secrets 410 – Apply with lip brush
  • Barry M Clear Lip Gloss – Apply with lip brush


Thanks for reading

Hannah xoxo

TV Make-up

As part of our semester 1 assessments we has to learn and recreate basic TV make-up. The make-up we had to recreate had to be suitable for day time TV e.g. news reader or TV presenter. The aim of TV Make-up  is to make the key features on the face, lips and eyes, stand out as these are the features that the eyes are drawn to. Also when doing TV make-up  it is important to warm the skin up by using as foundation that is a shade or two darker than the natural skin so that the skin does not look washed out on screen. Another key factor to consider when doing TV make-up is that as most televisions are now HD and will pick up any imperfections on the skin but also any make-up mistakes, because of this it is important to use a medium to full coverage foundation that can cover any imperfections, discolouration or blemishes on the skin but without looking like there is make-up piled onto the skin. Finally make sure that you powder as any oil on the skin show up on screen any will make the skin look shiny.  Below are some pictures of my final TV make-up assessment. Overall I am really pleased with final TV make-up and felt that my assessment went well.

Final tv make up (2)

Final tv make up (3)

Final tv make up

Products Used

Face:

  • Illamasqua Matte Primer -Buffed into the Skin
  • MAC Studio Tech Foundation – Buffed into the skin
  • W7 Concealer – Applied to under eye and on any blemishes
  • Illamasqua loose powder – Pressed onto skin using powder puff
  • MAC Bronzing Powder Matte Bronze – Applied to hollows of the cheek, temples and jaw line
  • MAC Powder Blush Cubic – Applied to apples of the cheek

 Eyes:

  • Urban Decay Eye shadow Primer Potion – Applied to eyelid up to brow
  • MAC Eye Shadow –
    • Orb – Apply all over lid and brow bone
    • Texture – Apply to crease and buff with MAC 224
    • Concrete – Apply to outer V and buff with MAC 224 and Apply to eyebrows with angled brush
  • MAC Fluidline Eye-liner Gel BlackTrack – Apply to thinly to upper lash line
  • Bourjois Paris Khole & Contour Eyeliner Eye pencil – Apply half way to lower lash line and smudge out and apply black eye shadow to set
  • Collection 2000 Longer Lash Mascara -Applied to both top and bottom lashes

 Lips:

  • Mac Lip Liner Whirl – Apply to outline of lips
  • Loreal Paris Studio Secrets 410 – Apply with lipbrush

Thanks for reading

Hannah xoxo

Yorkshire Scare Grounds

Back in October, i had my first work experience at the Yorkshire Scare Grounds ( here are the links to their Website, Twitter and Facebook). My class mates and I got an opportunity to go down to the scare ground in Wakefield and help out with doing the make up for the zombies that would be taking part in the scare grounds scenario of a Zombie Apocalypse. To create the zombies we used Kryolan Grease Paints, Glynn McKays bruise gels, Glynn McKays Wound Filler,Glynn McKays Congealed Blood, Fake Blood and Latex. Below are a few pictures of  the zombies me and my lovely friend Bex created .

This slideshow requires JavaScript.


Thanks for reading

Hannah xoxo

Laceration on the Hand

After practicing lacerations and mangled thumbs  in class, i decided to have a practice myself at home and created my own laceration on the hand. I created the laceration using Grimas Derma Wax, Glynn Mckay Bruise Gels (dark red) and Fake blood. Below are some pictures of the laceration i created as well as the method to recreate it.


my practice laceration (7)

my practice laceration (8)

my practice laceration (6)


Method

  • Roll Derma Wax in to a large worm shape and place on the skin
  • Blend both ends and the sides on to the skin ( TIP: You can use cleanser to help blend the edges)
  • Using a tooth pick or a plastic scalpel cut down the centre of the wax
  • Paint onto the wound by using GM dark red bruise gel
  • Finally add a small amount of fake blood

Thanks for reading

Hannah xoxo


Mangled Thumb

As part getting to know our special effects kit and learning basic techniques we were shown how to create a mangled thumb.  To create a mangled thumb there has to be a range of a few lacerations and cuts to multiple deep lacerations to give it  a realistic look. To create the mangled thumb we used Grimas Derma Wax, Glynn McKay bruise gel (dark red) and fake blood mine was home made or you can buy pre- made fake blood. Below are some pictures of my mangled thumb and the method on how to recreate it.


mangeled thumb

mangeled thumb (3)

mangeled thumb (2)

Method

  • Build up the Derma Wax around the thumb (works well on bony areas of the skin use a wet wipe to help smooth the wax and also helps making it easier to work with)
  • After building up enough wax use a toothpick to carve into the wax to create wounds 
  • Paint onto the wound by using GM dark red bruise gel.
  • To add to the effect you can also add a small amount of fake blood.

Thanks for reading

Hannah xoxo

First Design Task – African Tribal

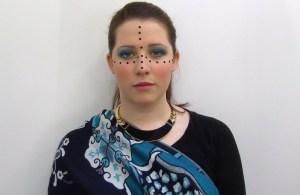
For our first design task we were given the concept of a country or culture. With this we were allowed to be a creative as we wanted with our idea. For my idea I decided to go with Africa and African Tribes. From this idea I created two mood boards one focusing on different aspects of Africa and then another one focusing on African inspired make-up. Below are some pictures of my final look on my model Katy. Second Design Task - African Tribal

Second Design Task - African Tribal (2)

For this look I kept the skin very natural with just a bit of blusher and a nude lip. For the eyes I went with colours yellow and blue as I was inspired by my pictures on my mood board. I also added black gems to the face as it is inspired by African tribal masks. To tie my final look together i added a tribal looking neck cuff and a blue scarf which I wrapped around the body. Overall I was very pleased with my final look and felt that the task went very well.

Thanks for reading

Hannah xoxo